 1-361-589-1048
Table of Contents
- Why Getting the Right Size Matters for Graphic Tees
- How to Measure for a Unisex T-Shirt
- Using a T-Shirt Size Chart for Adults
- Understanding Standard Graphic Placement for T-Shirts
- Sizing Graphics for Different Print Methods
- Common Sizing Mistakes to Avoid
- Frequently Asked Questions
Last Updated: September 25, 2026
Why Getting the Right Size Matters for Graphic Tees
Learning how to choose the right size for graphic tees isn't just about comfort. The fit directly affects how your design looks and how long the garment lasts. A shirt that's too tight stretches the print. One that's too loose makes your graphic look small and lost. Getting this right means your artwork displays exactly as intended.
We've seen customers struggle with sizing because they treat graphic tees like regular t-shirts. That's the first mistake. Graphic tees need a slightly different approach. The print placement, the garment construction, and how fabric behaves all change based on fit.
When you choose the right size, several things happen. Your graphic sits in the correct position on your chest. The design doesn't distort when you move. The shirt holds up better through washing because the fabric isn't under constant stress. And honestly, you just feel better wearing something that fits properly.
How to Measure for a Unisex T-Shirt
Measuring yourself correctly is the first step in how to choose the right size for graphic tees. Most people skip this and just guess based on their usual size. That's why they end up with shirts that don't fit right.
Measuring Your Chest Width
Your chest measurement is the most important number for graphic tee sizing. This determines where your print sits and how much space it has to work with.
Here's how to measure correctly:
- Wear a fitted shirt or no shirt at all
- Wrap a soft measuring tape around the fullest part of your chest
- Keep the tape parallel to the ground
- Don't pull tight, the tape should be snug but not compressing your chest
- Write down the number in inches
- Compare this to the size chart provided by the brand
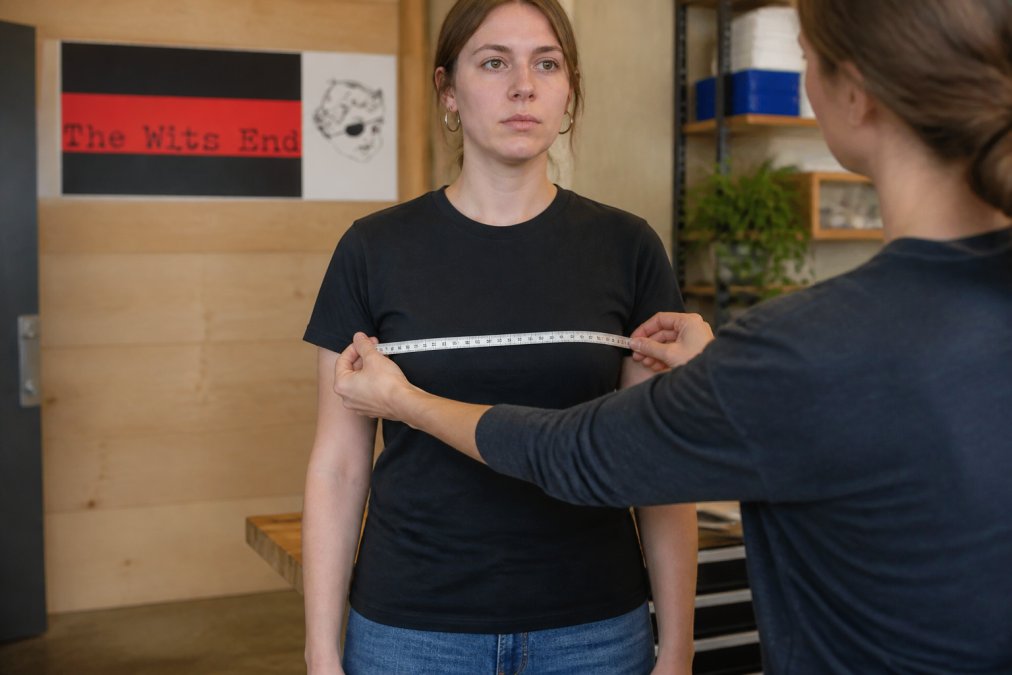
Most unisex t-shirts have a chest width measurement listed. A medium typically measures 18-19 inches across. A large runs 20-21 inches. But don't rely on size names alone, always check the actual measurements. Brands vary. One company's medium might fit like another's small.
Measuring Length and Sleeve Fit
Length matters just as much as width, especially for graphic placement. A shirt that hits mid-hip looks different than one that reaches your waist.
Measure length from the back of your neck:
- Stand straight with your arms at your sides
- Have someone measure from the base of your neck down your spine to where you want the shirt to end
- Most people prefer shirts ending at the hip or just below
- Write this measurement down
For sleeve length, measure from the center back neck:
- Reach your arm out to the side, slightly bent
- Measure from the back of your neck, across your shoulder, down to your wrist bone
- Divide this number by two, that's your sleeve length
- Sleeves should end just above your wrist bone, not covering it
Standard unisex t-shirts have sleeves that run 8-9 inches from the shoulder seam. If you have longer arms, look for tall sizes or extended sleeve options.
Using a T-Shirt Size Chart for Adults
A t-shirt size chart for adults gives you the actual measurements instead of relying on size names. This is essential because sizing varies wildly between manufacturers.
The best charts include:
- Chest width (the most critical measurement)
- Length from collar to hem
- Sleeve length from shoulder seam to cuff
- Shoulder width
- Fabric weight or thickness
When you're looking at a size chart, match your measurements to the closest fit. If your chest is 19 inches, look for a size with 19-20 inches across. If you're between sizes, decide based on how you like your fit. Do you prefer a closer fit or more room? That preference should guide you toward the smaller or larger option.
| Size | Chest Width | Length | Sleeve Length |
|---|---|---|---|
| XS | 16-17" | 27-28" | 7.5-8" |
| S | 17-18" | 28-29" | 8-8.5" |
| M | 19-20" | 29-30" | 8.5-9" |
| L | 21-22" | 30-31" | 9-9.5" |
| XL | 23-24" | 31-32" | 9.5-10" |
| 2XL | 25-26" | 32-33" | 10-10.5" |
This table shows typical unisex sizing. Your actual measurements might vary slightly depending on the brand or fabric type.
Understanding Standard Graphic Placement for T-Shirts
Where your graphic sits on the shirt matters enormously. Placement affects how the design looks when worn and how it photographs. Understanding standard placement helps you choose the right size for graphic tees.
Left Chest vs. Full Front Placement
Left chest placement puts your design on the left side of the chest, similar to a brand logo. This works for smaller graphics, usually 3-5 inches wide. It's professional, subtle, and works across all sizes without distortion issues.
Full front placement centers the design across your entire chest. This is more dramatic and visible. It works best for medium to large graphics, typically 8-12 inches wide. The challenge is that a full front design must fit within your actual chest width. If you size up too much, the graphic stretches horizontally. If you size down, it compresses and looks cramped.
For full front designs, your chest measurement becomes critical. A 20-inch chest can comfortably display a 10-inch wide graphic. A 24-inch chest can handle 12-14 inches. The design should take up roughly 40-60% of your chest width. Any more and it looks overwhelming. Any less and it gets lost.
Design Dimensions and Print Area Sizing
The print area is the space on the garment where your design can actually be printed. This area is smaller than the total shirt size because printers need margins around edges.
Standard print area dimensions:
- Left chest: 3-5 inches wide, placed 2 inches from the left shoulder seam and 2 inches down from the collar
- Full front: 8-12 inches wide for medium to large sizes, centered on the chest
- Back print: 10-14 inches wide, centered vertically
The print area also depends on the garment size. A small shirt has a smaller usable print area than a large. This is why oversized graphics look disproportionate on smaller sizes.
When choosing a size, think about how your design will sit. If you want a 12-inch wide graphic, you need a chest wide enough to accommodate it without stretching. That typically means a large or extra-large.
Sizing Graphics for Different Print Methods
Different printing techniques affect how you should size your graphics. Screen printing and direct-to-garment printing have different requirements.
Screen Printing vs. Direct-to-Garment Sizing
Screen printing involves pushing ink through a mesh stencil onto the fabric. This method works best with designs that have bold lines, solid colors, and clear contrast. Screen printed graphics are durable and vibrant, but they require more planning for sizing.
With screen printing, your design needs clear separation between colors. The print area is typically 8-12 inches wide for front placement. The ink sits on top of the fabric, so it doesn't stretch with the garment, but the fabric underneath can shift, which is why proper sizing matters.
Direct-to-garment (DTG) printing sprays ink directly onto the fabric using inkjet technology. This method allows for photo-realistic images and unlimited colors. DTG prints integrate into the fabric rather than sitting on top of it.
For DTG, you have more flexibility with design complexity. You can use gradients, photographs, and intricate details.
Oversized and Statement Graphics
Oversized graphics are intentionally large and dramatic. These designs work best on larger sizes because they need room to breathe. An oversized graphic on a small shirt looks cramped. On a large or extra-large, it makes a real statement.
Common Sizing Mistakes to Avoid
Most people make predictable mistakes when choosing graphic tee sizes. Knowing these helps you avoid them.
Frequently Asked Questions
How do I know what size graphic to put on a t-shirt?
For standard adult t-shirts, a left chest graphic should be 3-4 inches wide, while full front designs work best at 10-14 inches wide depending on your garment size. Measure your actual chest width, then scale the graphic proportionally. A good rule: full front graphics should cover roughly 30-40% of the front surface without overwhelming the shirt or creating visual imbalance.
What size should my t-shirt design be in pixels?
Most screen printing and direct-to-garment services require artwork at 300 DPI for crisp results. For a 4-inch left chest print, aim for 1200x1200 pixels minimum. For full front designs (12 inches wide), target 3600x3600 pixels. Always check with your printer's specifications, as requirements vary by print method and fabric type.
Does graphic tee sizing differ between brands?
Yes, significantly. Hand-screened and custom apparel often sizes differently than mass-produced tees. Unisex cuts tend to run larger in the chest and shorter in length than fitted styles. Always consult the specific t-shirt size chart for adults provided by your printer or brand, and measure your preferred shirt to compare against their measurements rather than relying on standard S/M/L labels.
How far down from the collar should a graphic be placed?
Standard placement positions the top of a center chest graphic 2-3 inches below the collar seam. Left chest designs typically sit 1.5-2 inches from the shoulder seam and 2-3 inches down from the collar. Maintain these margins to ensure the design looks balanced and doesn't interfere with neckline or seam stress points where fabric stretches during wear.