 1-361-589-1048
Table of Contents
- Why Graphic Tee Stains Need a Different Approach
- Know Your Print Before You Treat the Stain
- Tools and Materials You Need Before You Start
- How to Remove Ink Stains From a Shirt Without Touching the Graphic
- How to Get Grease Stains Out of a Graphic Tee
- The Best Stain Remover for Printed Shirts (and What to Avoid)
- Heat, Timing, and Washing: Protecting the Print After Treatment
- When to Stop and Call It: Signs the Print Is Already Damaged
- Conclusion
- Frequently Asked Questions
Last Updated: October 19, 2026
Why Graphic Tee Stains Need a Different Approach
A graphic tee stain is not just a stain. Treat it like one and you risk lifting the ink off the shirt along with the ketchup.
A printed design sits on top of the fabric, bonded by heat, solvent, or cured ink, and many stain removers attack that bond. Bleach, harsh solvents, and hot water can fade a graphic, crack the ink, or leave a ghost outline.
So the goal changes: remove the stain while keeping the print intact. Three rules guide everything below:
- Identify the print type before you touch the stain
- Spot-test any chemical on a hidden area first
- Use the gentlest method that works, and stop early
Know Your Print Before You Treat the Stain
Print type decides which cleaners are safe. Water-based and plastisol prints react differently to alcohol, acetone, heat, and prolonged detergent contact. Guess wrong and you fade, crack, or lift the design.
The Four Common Finishes and How They Behave
Plastisol ink is a thick, plastic-based ink that sits on top of the fabric as a cured film.
Water-based ink soaks into the cotton and feels soft, almost like the fabric itself. It is fragile around strong solvents because the pigment is bound into the fibers, not a plastic film.
DTG (direct-to-garment) printing sprays water-based ink into the fabric, so it behaves like a water-based print.
Heat-transfer vinyl is a plastic film bonded with adhesive.
Quick Compatibility Matrix
| Print type | Rubbing alcohol | Acetone | Hot water / dryer heat | Mild detergent |
|---|---|---|---|---|
| Plastisol | Brief, sparing dabs | Swab only, plastisol confirmed | Avoid high heat | Safe |
| Water-based | Avoid | Never | Avoid | Safe |
| DTG | Avoid | Never | Avoid | Safe |
| Heat-transfer vinyl | Avoid | Never | Avoid; air dry | Safe |
The Rub Test and the Hidden-Area Spot Test
A simple rub test gets you close. Rub the print gently with a clean finger: raised and rubbery means likely plastisol; flat and soft means treat it as water-based or DTG; a distinct film edge means likely heat-transfer vinyl.
Then run a spot test before any chemical touches the design. Choose an inside hem, an unprinted back panel, or the inside of the shirt tail.
When You Cannot Tell What You Have
If you are unsure what you have, treat the shirt as the most delicate option: cool water, mild liquid detergent, a soft brush kept off the print, and air drying. A faint stain beats a ruined graphic, and a print you cannot identify is not one you should hit with solvent.
Tools and Materials You Need Before You Start
Gather everything first:
- Clean white cloths or paper towels
- Cotton swabs for precise dabbing
- Rubbing alcohol (isopropyl)
Skip these entirely:
- Chlorine bleach
- Oxi-type color boosters on the printed area
- Hot water
How to Remove Ink Stains From a Shirt Without Touching the Graphic
Ink stains are the trickiest because ink is chemically similar to the print itself. Keep the solvent on the stain and away from the design.
Here is the step-by-step for how to remove ink stains from a shirt safely:
- Lay the shirt flat on a clean towel, print side up.
- Dip a cotton swab in rubbing alcohol and dab the ink stain only.
- Work from the outside of the stain inward so it does not spread.
- Blot with a clean white cloth as the ink lifts.
- Swap to a fresh swab as soon as it gets dirty.
- Rinse the area with cool water and pat dry.
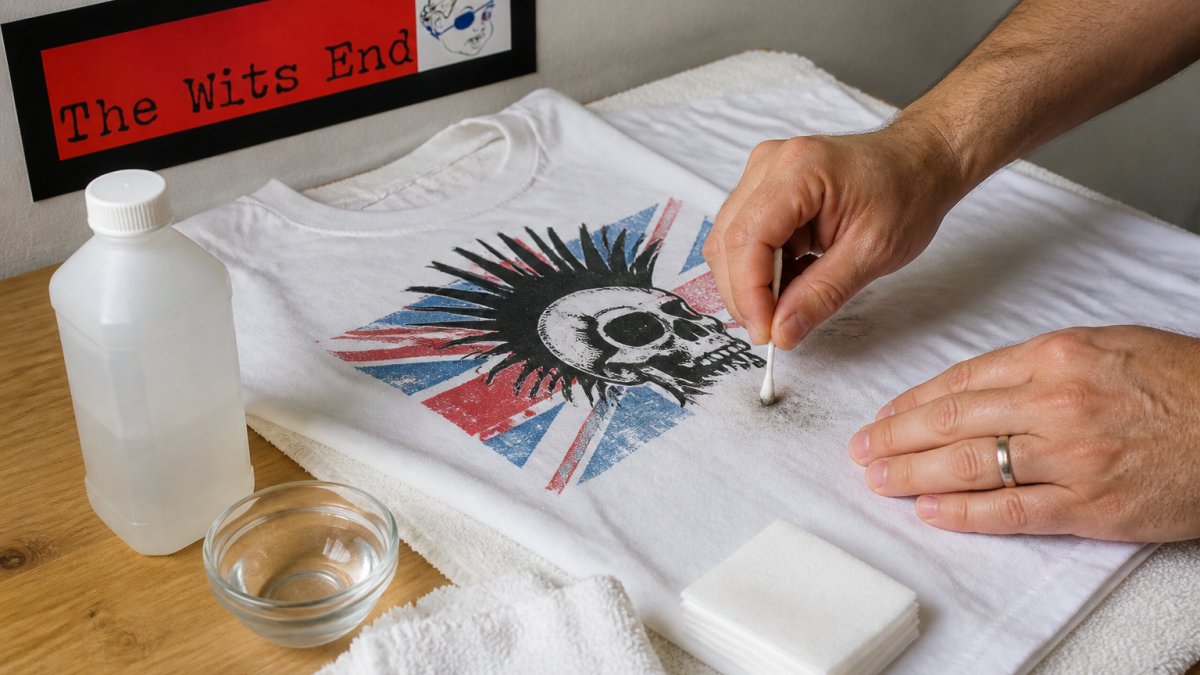
Keep the swab away from the printed edge. If the stain touches the design, work slowly and stop the moment the print starts to look wet or glossy.
Rubbing Alcohol and Acetone: Which One to Use
Use rubbing alcohol first. It is gentler and safe for most prints when applied sparingly. Acetone is stronger and only belongs on plastisol ink, applied with a swab and never poured on.
Acetone works fast, which is both its strength and its risk, it can dull a plastisol print if you overapply. Start with alcohol and move to acetone only if the stain will not budge and you have confirmed a plastisol print.
How to Get Grease Stains Out of a Graphic Tee
Grease is an oil-based stain, and oil does not dissolve in water, which is why a normal wash cycle often spreads a grease spot instead of lifting it. You need a surfactant, a detergent molecule that grabs the oil at one end and the water at the other, sitting on the stain long enough to work. The print changes the plan because many degreasers and dish soaps are stronger than the ink bond, especially on water-based and heat-transfer vinyl designs.
Here is how to get grease stains out of a graphic tee without lifting the graphic:
- Blot, do not rub. Press a paper towel or clean white cloth onto the grease to pull up surface oil. Rubbing pushes oil deeper into the cotton and toward the print edge.
- Apply a concentrated surfactant. A drop of mild liquid dish soap or a clear, dye-free liquid laundry detergent goes directly on the stain. Dish soap is formulated for grease, which is why it outperforms most laundry detergents on cooking oil and salad dressing.
- Let it dwell for 10 to 15 minutes. Surfactants need contact time to surround the oil. Do not let it dry out; if it starts to crust, add a drop of cool water.
- Work it in with a soft brush, staying off the print. Use an old toothbrush or soft-bristle brush in small circles on the stain only. Keep the bristles at least a half inch away from the printed edge.
- Rinse with cool water. Warm or hot water can soften the adhesive on heat-transfer vinyl and can set the grease if any remains.
- Repeat once if needed, then air dry. Check the stain under good light before any heat touches the shirt.
Fresh Grease vs. Set Grease
A fresh grease stain, within a day or two, usually lifts with one or two detergent treatments. A set grease stain, one that has been through the dryer or sat for a week, has oxidized and bonded to the fibers. For set grease, apply the detergent, let it dwell 30 minutes, and repeat up to three times. Repeated mild treatments beat one aggressive solvent pass, because the aggressive pass is what damages the print.
When the Grease Overlaps the Print
This is the hard case. If the grease sits partly on the design, treat the fabric side first and keep the detergent off the ink. Apply the soap with a cotton swab to the fabric portion only, let it dwell, and rinse with a spray bottle of cool water rather than running the whole shirt under the tap. If grease has soaked into the print itself, do not scrub.
What Not to Do With Grease
- Do not rub baking soda or salt into the stain; the grit can scratch cured plastisol ink.
- Do not iron the shirt to "dry" it before the grease is gone. Heat sets grease permanently.
- Do not use chlorine bleach as a grease remedy. It does not break down oil and it fades both fabric and print.
The Best Stain Remover for Printed Shirts (and What to Avoid)
The best stain remover for printed shirts is a mild liquid detergent plus cool water, applied by hand and rinsed thoroughly. It handles most food, grease, and drink stains without touching the ink bond.
Enzyme-based detergents are a solid second option for protein stains like grass or blood. Apply a small amount, let it sit, and rinse.
What to avoid:
- Chlorine bleach, which fades both fabric and print
- Powdered cleaners with grit that can scratch cured ink
- Solvent-heavy spot removers on water-based prints
Heat, Timing, and Washing: Protecting the Print After Treatment
Heat is the quiet killer of printed designs. Even after the stain is gone, the wrong drying or washing routine can crack the print within a few cycles. Follow these rules after treatment:
- Wash inside out on a cold, gentle cycle
- Use mild detergent and skip fabric softener
- Air dry or tumble on low heat
Treat fresh stains within a day when you can. The longer a stain sits, the more it bonds to the fabric and the harder it is to lift without stronger chemicals.
When to Stop and Call It: Signs the Print Is Already Damaged
Sometimes the print is already compromised before you start. Knowing when to stop saves you from making it worse.
Watch for these signs:
- The print feels sticky or tacky to the touch
- Edges are lifting or peeling
- The ink looks chalky or faded in patches
If you see these, the print is fragile. Skip solvents entirely and use only cool water and mild detergent. If the design is already peeling, cleaning will not fix it, and strong chemicals will finish it off.
Conclusion
A stained graphic tee is not a lost cause, but it demands care. Identify the print, spot-test your cleaner, and match the method to the stain. Ink needs a swab of alcohol.
At The Wits End, we create apparel with durable graphics and inclusive sizing up to 5XL. Caring for a print the right way keeps it looking sharp for years.
Frequently Asked Questions
How do you remove a stain from a graphic tee without damaging the print?
Treat the stain from the inside of the shirt, not the printed side. Blot with a clean cloth and a small amount of rubbing alcohol or a print-safe stain remover, working around the graphic rather than scrubbing across it. Always spot-test on the inside hem first. Avoid bleach, hot water, and direct iron contact on the print, since those are the fastest ways to crack, fade, or lift a screen-printed or DTG design.
Should you wash graphic tees inside out?
Yes. Turning the shirt inside out protects the print from rubbing against other garments and the drum during the wash cycle. Use cold water and a gentle cycle, and skip the dryer or use low heat. Heat is the main enemy of plastisol, water-based, and heat-transfer vinyl prints, so cold washing and air drying keep the graphic looking sharper for longer.
Can you use stain remover on a graphic T-shirt?
You can, but choose carefully. Oxygen-based stain removers are generally safer for printed shirts than chlorine bleach, which can strip color from both the fabric and the ink. Apply the remover to the stained area only, keep it off the printed design, and rinse thoroughly before washing. Spot-test an inconspicuous area first, especially on DTG and water-based prints that absorb chemicals differently than plastisol.
Does bleach ruin graphic tees?
Bleach can ruin a graphic tee in two ways: it fades the fabric color and it breaks down the ink in the print, causing cracking, peeling, or a washed-out look. Even color-safe bleach is risky on DTG and water-based prints. For stains on printed shirts, stick to oxygen-based cleaners, rubbing alcohol for ink, and dish soap for grease, and keep chlorine bleach away from the garment entirely.